The Raspberry Pi is a small yet power platform that is perfect for building a cost effective cybersecurity training lab. In this article we will look at installing Docker on a Raspberry Pi 4 (4GB) running Kali Linux (64 bit).
The case pictured is the Official Raspberry Pi 7″ touchscreen in a modified touchscreen case. It was made for the Pi 3, only slight modifications were made so the Pi 4 could fit in it. Modify cases at your own risk, you could cut yourself or destroy your case.
Installing Kali Linux on a Pi 4
This article assumes that you have already installed and updated Kali Linux on your Pi 4. If you have not, simply download the 64 bit Kali Linux 4 ARM image from Offensive Security.
Extract the image, write it to an MicroSD Card, insert it into your Pi4, attach peripherals, and power last of all. Allow the system to boot up completely.
Login with “kali/ kali” – Since Kali 2020, you no longer use “root/ toor” to log in. Reboot, Update and Upgrade, and reboot one last time. You are now ready to install Docker.
You can add a user to the Docker group if you wish:
sudo usermod -aG docker username
You may need to start the Docker service manually
sudo service docker start
That’s it! You can now run Docker and install any Docker images that you want.
OWASP Juice Shop on the Raspberry Pi
Some Docker containers will not run on ARM, but you can find ports for some of the more popular ones. Just realize that some times these aren’t “Official” images, so proceed with due caution.
Also, the purposefully vulnerable Docker Images are just that, so follow all precautions necessary to protecting your systems while running them. The most preferred method is a stand alone local address only test LAN, disconnected or firewalled from both the internet and any production systems.
We will install the Docker “OWASP Juice Shop” image from the Docker library. This is an ARM port of the official OWASP Juice Shop program.
To install, and run, simply open a terminal and type:
docker run -d –name juice-shop -p 3000:3000 santosomar/juice-shop-arm64
Docker will pull down the image, and run it.
Once it is installed:
Open a browser and navigate to localhost:3000 or IP_Address:3000
You are now good to go! You can begin testing your skills locally on the Pi or you can use a LAN system to practice your skills. A full write up on “Pwning OWASP Juice Shop” can be found here:
A list of challenges for Juice Shop is available. As you complete each challenge, the website keeps track of your pwning progress. Here is one of my favorites, the “Melee Kitty”!
Enjoy and most importantly, have fun!
If you would like to learn a lot more about using Raspberry Pis in the security field, check out my latest book, “Security Testing with Raspberry Pi“!
Bring next level intelligence to your Raspberry Pi projects with the Grove AI HAT for Edge Computing. In this article we will take a quick hands-on view of the Grove AI HAT board & Ultrasonic Sensor in standalone mode, and used as a Raspberry Pi HAT.
Introduction
The Grove AI HAT for Edge Computing is built around Sipeed MAix M1 AI MODULE with the Kendryte K210 processor inside. It’s a low cost but powerful stand-alone board that can also run as a Raspberry Pi Artificial Intelligence HAT.
The board not only bristles with peripheral connections (I2C/UART/SPI/I2S/PWM/GPIO), but has built in audio and video processing capabilities for AI projects. This means you can connect multiple Grove Sensors to the board. Couple that with its video and audio capabilities and it makes it an interesting choice for Edge Computing environments.
Seeedstudio provided me with a
Grove AI Hat board for review. There are plenty of articles on the technical
specs of the board, so this article will be more of a “hands-on” usage review.
Let’s hook a Grove sensor up to the board and use it on its own, and as a
Raspberry Pi HAT.
The Grove AI HAT is a new board,
so there are not a lot of usability instructions available at this time. One of
the quickest ways I found to interface with the board is to use the Seeedstudio
Arduino interface. The ArduinoCore-API interface has been added to the board,
allowing support for multiple development environments, including Arduino IDE,
Linux, Windows, and Mac OS X. This basically means you can run Grove Arduino
Libraries and many other Arduino libraries on this board.
Enough intro, let’s see it in action!
Basic Arduino Instructions
The Grove AI HAT can function
entirely on its own and in conjunction with a Raspberry Pi. A good starting
point is to connect one of the many Grove sensors to the board, and perform
basic input/ output using the Arduino library.
In this section, we will see how to interact with a Grove Ultrasonic range sensor and view the output using the individual board, and then as a Raspberry Pi HAT.
Follow the Arduino setup instructions on the Seeed website carefully. You need to add board drivers and use a specific writing option (K-flash), if you pick the wrong options, your board will not function properly.
Download and install the Arduino IDE on your
computer
Run Arduino IDE
Add the K210 Grove AI HAT for Edge Computing
driver
Select the K-flash programmer
The Arduino IDE is now configured to work with the Grove
board.
Using the Grove Board Standalone
Once everything is setup, you can
use Seeed’s sample Arduino code to control the board directly. For example, the
Ultrasonic sensor.
WARNING: Do no connect or
disconnect sensors to the board while it is powered up, you could damage it!
Connect your range sensor to the board (I used port D13)
Then using a USB C cable, connect
the board to your computer. This will power up the board and allow your computer
to communicate to it.
Next,
load in the ultrasonic Arduino library into your sketch project folder.
In
the Arduino IDE, enter the sample code provided by Seeed:
Compile and write the code to your board
Now, open the Arduino serial monitor and you should see live range detection:
Move your hand back and forth in
front of the range detector, you should see the range update live in your
Serial Monitor tab.
That’s all well and good, but this is a Raspberry Pi HAT!
How do you use it with a Raspberry Pi?
Grove on the Raspberry Pi
In this section we will look at using
the Grove AI board with a Raspberry Pi 3b+. The Pi 3b is running Raspbian and
is setup up for remote access via Putty. To use the Grove Board and Pi in
tandem, we need to connect them together. Disconnect power (the USB cable),
connect the riser board to the Grove board, and then carefully connect the Pi
and grove boards together. Make sure no power is applied to either board, and
the pins line up correctly, or you could damage your boards.
Only provide power to one board, the Pi or the Grove Hat,
if you connect power to both boards you need to change a switch on the Grove
board.
Connect the USB cord from your PC
to the Grove power port. Both the Grove board and Raspberry Pi should power up
at the same time. In this configuration, you can still use the Arduino Serial
Monitor to view the sensor output. But we want to see it on the Pi.
To use the Grove board on a Pi, we will need to install the
Grove Python library.
Now with the Grove library installed, we can run a short
Python program to communicate with the Sensor through the Raspberry PI.
cd
~/grove.py/grove
Enter in, save and run the following Python program in the
grove directory:
ultrasonic.py:
It should
look like this when done:
Now, just run the ultrasonic.py program:
And that’s it! You should see distance displayed in real
time.
You can open the Arduino Serial monitor and get readings
from it at the same time, as seen below:
One interesting feature is that if the Pi is shutdown, or
the Python program stopped, the Grove board can continue to work.
As seen below:
The Ultrasonic program was stopped, but the device continues
to operate as seen in the Arduino serial monitor.
AI Computing
As mentioned at the beginning of
this video, the Grove HAT has video and audio processing capability built in. I
ran into some questions on how to access the video and audio part of the card
and am waiting to hear back from Seeed tech support. So, I will explore this
capability in future articles, but for now, Seeed has a great demo video of
this capability on their website:
This was just a very basic intro to the Grove AI HAT for Edge Computing. The board is very exciting as it brings a host of sensor capabilities to the Raspberry Pi platform. I believe this will allow for much more intelligent Pentest drop boxes (it could sense and record when someone was in the room, for example), robotics projects, Magic Mirrors, and whatever else you can dream up. Stay tuned, more to come!
About Seeed Studio: Seeed is the IoT hardware enabler providing services over 10 years that empower makers to realize their projects and products. Seeed offers a wide array of hardware platforms and sensor modules ready to be integrated with existing IoT platforms and one stop PCB manufacturing and Prototype PCB Assembly.
Seeed Studio provides a wide selection of electronic parts including Arduino, Raspberry Pi and many different development board platforms. Especially the Grove System help engineers and makers avoid jumper wires problems. Seeed Studio has developed more than 280 Grove modules covering a wide range of applications that can fulfill a variety of needs.
Building a Raspberry Pi 4 Ethical Hacking platform using The
Pentesters Framework and DietPi.
I’ve been playing with using different hacking tools and Operating Systems with the Pi 4. In this article I cover installing The Pentesters Framework on a RPi 4 running DietPi.
DietPi is a very lightweight Debian OS for the Raspberry Pi. The Pentesters Framework by TrustedSec is an Ethical Hacking installation script that automatically installs and updates over 250 modules/ tools. It would be great if they would work together on a Raspberry Pi 4. The good news is that is does – With a couple tweaks.
I cover installing and using The Pentesters Framework on Raspberry Pi in my latest book. So, I am not going to go into great detail on using the tools in PTF. I just want to cover actually installing it on DietPi.
Installing
NOTE: You will need a Raspberry Pi 4, and at the minimum a 32 GB MicroSD card if you want to install all of the PTF tools. Don’t have a Pi 4? Seeed is currently offering free shipping for orders over $119 with a Raspberry Pi 4 4GB.
Write the image to a MicroSD card, balenaEtcher works great!
Insert the MicroSD card into your Pi, attach peripherals and
lastly connect power (always connect power last). When DietPi boots up you will
be presented with some options.
Pick any software install options you want, then
“Go install software”
Requested software and updates will be installed
Reboot when finished
I just run through it quickly the first time to get the
latest OS updates. Note the CPU temp warning, it’s a Pi 4, it runs hotter than
a Pi 3.
To install an “X” Desktop or any other included software,
type, “dietpi-software”.
There are a ton of add-on software options under “Software Optimised”.
For example, if you want a graphical desktop, pick the X-Desktop you want and
then the “Go install software” option. You can also setup your login
preferences from this menu – auto login, desktop login, etc.
All we really need here is to install Python. Then we need
to make a small config file tweak and finally install PTF.
Installing Python
From the DietPi-Software menu, go to “Software Additional”
and install Python:
Cursor down to Python Pip, hit the space bar to
select it.
Select “OK”
You will return to the main menu.,
Cursor down and select “Go >> Start Installation”
Reboot when finished
We need to install git:
Open a terminal and enter, “apt install
git”
Next we need to comment out a line in the ‘/etc/hosts’ file
or the PTF install will error out.
Comment out the “::1 localhost IPv6 localhost” line
Reboot
That’s it! We can now proceed with the standard PTF install:
Type “show modules” to see all available modules. You can install individual ones if you wish. If you have a large memory card (32 Gb), you can install all of them.
To install all tools, enter “use modules/install_update_all“
Reboot when finished
The install will take a very long time, especially if you
install all of the modules. After install, all tools will be located in
category themed directories under the ‘/pentest’ directory, as seen below:
Many of the tools can be run from anywhere, but some tools require you to change into its install directory for it to work properly. This is usually ‘/pentest’, but some run from ‘/usr/share’ as well. Check it out, there are a ton of very good tools at your disposal, like “Sniper”:
And there you have it. Again, I go into much deeper detail in my book about using PTF on a Pi, I just wanted to show how it could be installed on DietPi. If you want to learn a lot more about using Raspberry Pi for Ethical hacking check out my latest book – Security Testing with Raspberry Pi
This is a partial sample chapter from my latest “Security Testing with Raspberry Pi” book – The full chapter (chapter 4) is over 20 pages long and includes how to use several of the installed Kali Linux tools.
In this chapter we
will cover installing Kali Linux on a Raspberry Pi 3b+. We will also see how to
run several Kali tools on this platform. As I assume the reader has used Kali
Linux before, the goal is to show how to get up and running quickly on a
Raspberry Pi, not necessarily to show how to run each individual tool. Most of
the tools work just like they would in a full PC install of Kali. Though some
of the tools, like Hashcat, apparently don’t have ARM compatible binaries and
are not included in the Kali Pi version.
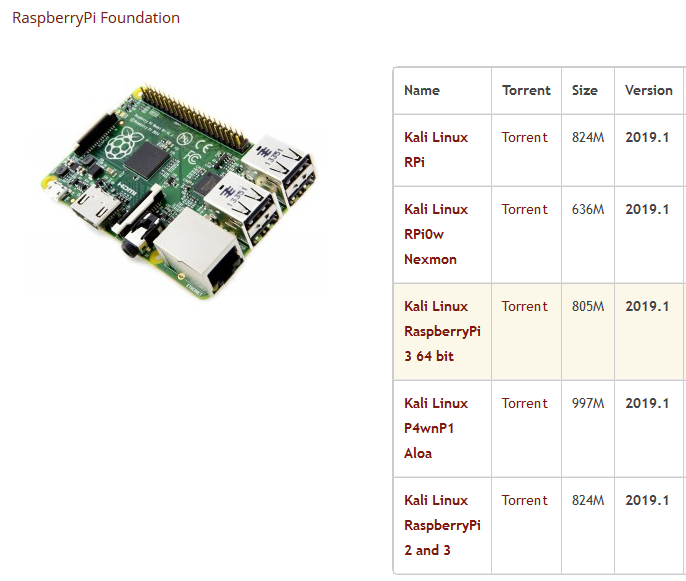
Navigate to the
Kali ARM images and then select the Raspberry Pi branch. Download the version of
Raspberry Pi for the Pi that you have. I used a Pi3b+ for this chapter, so I
downloaded the Kali Linux Raspberry Pi 3 64-bit image. If you have a Pi 4,
you must download the Pi 4 version of Kali.
Once the image is downloaded, all you need to do
is write it you your SD Ram card.
Etcher works great:
Insert your memory
card into the Pi, attach keyboard, mouse, network line, and video cable.
Lastly, plug in the power cord. The Pi will boot up and give you a graphical
login screen.
Login with User: root, Password: toor
At the “Welcome to
the first start of the panel” message, click on “Use default config”. You will then be presented with the Kali
Desktop. Take a second and familiarize yourself with it. You will notice it is
slightly different looking than the regular Kali Desktop, as it is using a
different desktop environment. Xfce is used as the default Pi interface as it
is a lightweight and fast desktop. But it is the same Kali underneath that you know
and love.
Click the “Applications”
button to see the tools menu. They are pretty sparse at the moment; we will fix
that soon. There are a couple house keeping things we need to do first.
The first thing we will want to do is regenerate
the SSH security keys.
Open a Terminal
cd /etc/ssh/
mkdir default_keys
mv ssh_host_* default_keys/
dpkg-reconfigure openssh-server
In a couple seconds
we should have new SSH security keys.
In the current
version of Kali for the Pi, root login is permitted by default. This is fine
for our lab, but this is something you would want to change in “/etc/ssh/sshd_config” if you were going
to use this for regular purposes. You will also want to change the root
password using the “passwd” command.
The SSH server is
already started by default in the Kali Pi install, so all we need is the IP
address of Kali. If you are an old time Linux user like me you will probably
still use Ifconfig, the old “deprecated” commands are easier to use and look
nicer in my opinion, (have to love change, lol) though you are supposed to use
the “ip” command now.
Enter, “ip a” to see all the network
addresses or “ip -4 a” to only see the ip 4 address.
Now you can just SSH or use Putty like we
did in the previous chapter to connect remotely to the Kali system.
The Kali-Pi image
comes pre-installed with some tools already installed. They were called the
“top 10” in an earlier release of Kali and include Metasploit, nmap, Recon-NG, etc. The rest of the Kali tools can be downloaded
via Kali “Metapackages”. Metapackages are security tool packages
grouped by function. If you have a 16 GB or greater SDRam card, and a lot of
patience, you can install the full Kali Linux install. If you didn’t need all
of these tools, you could install just the Wireless tools (kali-linux-wireless)
or the Web Application Assessment tools (kali-linux-web), depending on your
needs.
All the available Metapackages are listed
on the Kali Metapackages website:
Installation is
simple, in a terminal just enter, “apt install” along with the
metapackage that you want. You basically have 2 options; you can install the
full package or individual tool packages. The only drawback to option 2 is that
some of the necessary “helper” tools may not be installed and you may need to
install them manually.
Option
1
If you want the
full Kali install:
apt install kali-linux-full
This
includes all the tools from a normal Kali Linux install. This will take a very
long time to install, so be patient.
Option
2
If you want to
install a specific category of tools:
Depending on what
you want to do with your Kali install, a good choice is the Wireless tools. The
wireless package includes numerous tools including ones for Wi-Fi, Bluetooth
& SDR. You can see what packages are included by using the following
command:
apt-cache show kali-linux-wireless |grep Depends
If these are the
tools that you want, then proceed with the install:
apt install kali-linux-wireless
Whichever option you pick, the new tools will
show up in the Kali menu after the install:
Either install
option seems to take hours, be patient, and reboot when it is finished.
The downloaded tools are the SAME tools that you would receive on the regular Kali install. These aren’t watered down versions or anything like that. I have run into a couple tools that didn’t work, or seemed to be missing, but it is a rare occurrence. If it works in the regular Kali install, chances are you can do the same thing, the same way, in the Raspberry Pi version. So, after that long install, let’s play!
If you liked this sample and want to learn a lot more about using the Raspberry Pi for Ethical Hacking, check out my new book, “Security Testing with Raspberry Pi“!