Based on my, “Security Testing with Raspberry Pi, Second Edition” book, the video class covers many of the same topics and some new. The book has been very popular over the years and used for training by multiple branches of the military and the Special Forces.
My video training covers:
Installing Kali Linux on a Pi
Basic Network Scanning
webApp Security Scanning
Wireless Scanning and Attacks
Intelligent Ducky Script attacks with P4wnP1 ALOA
Using the Pi for Command and Control – Starkiller Empire and PoshC2
SDR with Dragon OS
Building a Custom attack Platform with PiOS or Ubuntu
Future uses of Pi, and much more!
Though a separate class, it goes along very well with the book and covers several of the same topics.
Looking to take your security skills to the next level? Check it out on Udemy!
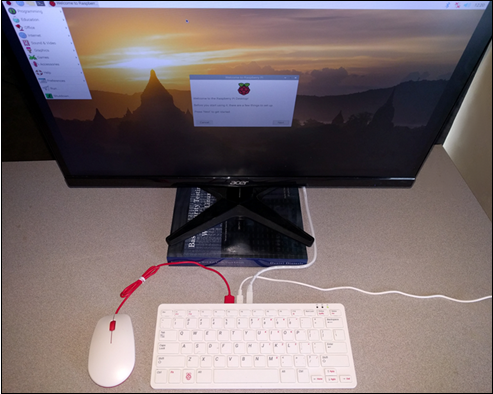
The Pi 400 makes creating a hacking system with Raspberry Pi extremely simple – it is literally burn, boot and done!
The Pi 400 is an “all in one” keyboard version of the Raspberry Pi 4. For all intents and purposes, it is a Raspberry Pi 4, though it has been flattened out a bit and the circuitry has been modified to reflect the changes. The Pi 400 is perfect as a hacking system, as you can easily install and use a fully function version of Kali Linux on it.
In this article, we will look at installing Kali, and running some quick WIFI attacks. All that is needed hardware-wise for this article is the Pi 400 (complete kit) and a Kali compatible USB WIFI adapter. I used an TL-WN722N (v1!) and an Alfa AWUS036NHA, both worked “Out of the Box”.
I know, you can’t get the TL-WN722N v1 adapter new anymore, but there are tons of them out there, and it is one of the best short range WiFi adapters available.
The Pi 400 Complete kit is nice – it comes with the Pi 400, power supply, a memory card, mouse, HDMI cable and a “Raspberry Pi Beginners Guide” book. All you need is a monitor!
The Pi 400 complete kit also comes with a 16GB memory card pre-loaded with RaspiOS. Literally all you need to do is unbox, attach the peripherals, insert the memory card into the Pi, apply power and in a few seconds, we have a Raspbian desktop.
**NOTE: Never insert or remove the memory card when power is applied!
If you have never used a Raspberry Pi before, take your time and play with it. RaspiOS is a very good operating system, and a great way to learn how to use the PI – If you bought the complete Pi-400 kit, the included beginners guide will walk you through using RaspiOS, and more advanced topics like using the GPIO board and sensors.
Though that is not the purpose of this article, we want to turn the Pi-400 into a hacking platform, so let’s get to it!
Installing Kali Linux
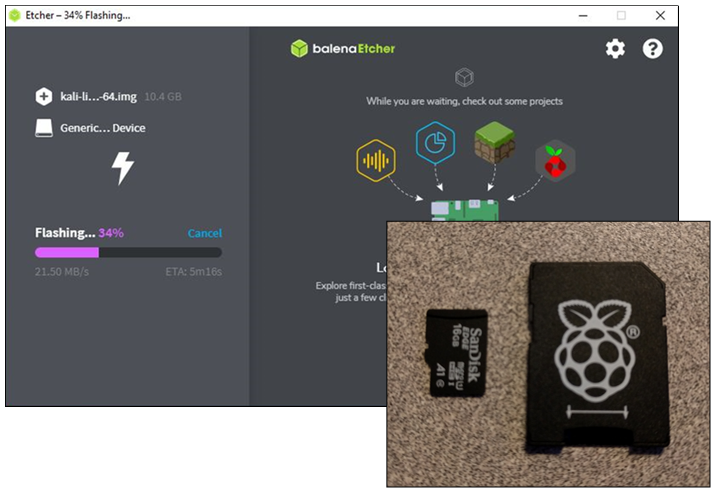
Installing Kali Linux on the Pi 400 is very simple. If you are finished using RaspiOS, you can use the memory card from the Pi 400 Kit or just use a new or blank one. All you need to do is download the official Kali Linux Pi 4 64-bit ARM image from Offensive Security, write it to the memory card using a program like BalenaEtcher, then insert the card into the Pi, apply power and boot.
Insert the memory card into the Pi 400, apply power and boot.
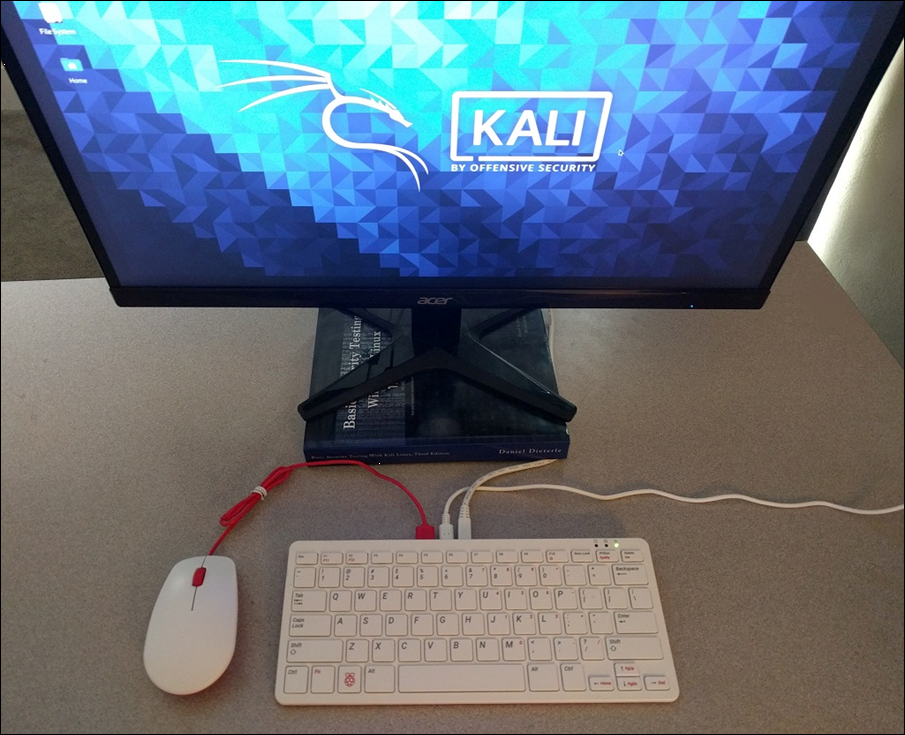
You now have a Kali Linux Desktop system!
Okay, So What Doesn’t Work
It’s not a Pi 4, it’s a Pi 400, something must be different, you say. Honestly, the only real difference I have run into so far is that the internal WiFi doesn’t seem to be recognized by Kali. Though it does work in RaspiOS. I am assuming it is some sort of driver issue, I haven’t had a chance yet to troubleshoot. Though I am not heart broken, I rarely use it, and always use a USB WiFi adapter for much better range and reliability.
WiFi Attacks with the Pi 400
Run “ifconfig” and make sure your wireless card is detected, it should show up as wlan0 and/or wlan1, once the onboard wifi driver is fixed.
First, let’s get the lay of the land with Airodump-ng. For the Wi-Fi hacking purists out there, who love iwconfig, Airodump will automatically put the card in the correct monitoring mode for you. All you need to do is run the command.
sudo airodump-ng wlan0
Our target, “Death Star” is currently running on Channel 11.
We can go for a “quick kill” using Besside-NG
sudo besside-ng -W -c [Channel] -b [Target_BSSID]
If the attack works, we get the WPA handshake file. It only took about 15 seconds; I’ve seen it work as fast as 5 seconds.
The Besside log file and the captured WPA handshake file (wpa.cap) are stored in the user’s home directory.
The handshake file can include a lot of unnecessary packets, you can clean these up with the beside-ng-crawler tool. Though it is really not necessary if just targeting a single target.
Bettercap 2 is an awesome Wireless attack tool with a lot more options. It is not installed by default, but is included in the Kali repository.
sudo apt install bettercap
Now all we need to do is run bettercap and turn on WiFi recon
sudo bettercap -iface wlan0
wifi.recon on
Looks a bit confusing, but we can clean it up with the Bettercap “Ticker” Display
set wifi.show.sort clients desc
set ticker.commands ‘clear; wifi.show’
ticker on
We now have nice color-coded display that works great even through SSH.
Now, let’s grab some handshake files:
wifi.recon.channel X (enter channel #)
wifi.assoc [BSSID]
or wifi.assoc all (warning – attacks all detected WiFi networks!)
Notice, “Death Star’s” Encryption type has turned to red. Bettercap successfully grabbed and saved the handshake. When finished, type “exit” to exit bettercap.
Captured handshake files and the bettercap log are stored in the Kali root user directory:
Unless the WPA key is extremely simple, you really don’t want to try to crack them on a Pi4. I highly recommend copying it off to a desktop system.
Conclusion
In this article we saw how to quickly and easily install Kali Linux on the new Pi 400 all in one keyboard system. The Pi 400 is a great choice as a hacking system due to it’s portability and compactness. It also can run a full desktop install of Kali Linux, or any other Pi 4 compatible OS, so your options are many.
We only covered using the Pi 400 in some quick WiFi tests, but as you have the full power of Kali Linux at your fingertips you could perform any level of pentesting with it that you could do with a normal desktop. Okay, it doesn’t have the same power as a high end desktop, so cracking passwords or some enterprise level tests may be out of the questions, but for $100 you can’t go wrong having the Pi 400 in your security testing toolkit.
If you want to learn a lot about security testing with the Raspberry Pi, check out my book, “Security Testing with Raspberry Pi“, available on Amazon.com.
Today we are going to take a quick look at the WIO Terminal – The all-in-one Arduino solution from Seeedstudio. I received a review unit from Seeed to test and had a blast, so let’s get to it!
This feature loaded device includes a 2.4” display, Wi-Fi, MicroSD Card Reader, microphone, IR Emitter, and more. At the pricepoint of about $30, it is very affordable. Of all the Arduino device I have tested in the last few months, the WIO Terminal is easily the most impressive. I also think it will be the one that will be the most useful in the security testing field.
The WIO Terminal comes with a 2.4” Display built in. You can custom program the display using code, or display photos & images, or app output. You can program the buttons to scroll through the pictures or as input. You could use the WIO to play games, a simple one was pre-encoded on the device when I received it:
There are a lot of walk throughs and excellent code examples for every feature on the WIO Terminal Wiki. You can use any of the demo programs included in the WIO Terminal Wiki to get up and running quickly.
Like playing with the built in sensors:
You can store and save files to the MicroSD card, just format it as FAT32 (See the WIO Terminal Wiki for coding instructions).
You can display images or run a photo display show. Just use the photo display example, and drag and drop the photos to the SD card before you insert it into the WIO.
You could add sound using the built in buzzer. For “May the 4th” day, I had the WIO show an image of Darth Vader and play the Imperial March!
Another cool features of the WIO that I haven’t seen in other devices, is that it has built in magnets. This would allow you place the WIO on any metal surface and it will stick (your battery source would need to have magnest also). This could come in handy during a Red Team or Pentest, just snap the device onto a metal cabinet or inside a desk.
The built in microphone is a very interesting feature – you could program it to trigger on sound:
More capabilities are being added to the microphone library, so I am thinking at some point you would be able to record sound and save it on the internal SDCard. Of course, as a pentester, you wouldn’t want it to say “Microphone Reading”, lol.
Maybe something more like this:
The WIO can also connect to and act like a Raspberry Pi HAT! Note: connector pins not included
The WIO Terminal can act as a USB client or host, I think this will be a great opportunity to turn the WIO into a HiD attack device, like a Rubber Ducky. Maybe at some point a USB ethernet connector would work with it, that would be very interesting. There were some coding issues with the HiD interface when I tried it out, but it is being worked on as we speak, and will be fixed soon.
Add in the ability to scan and attach to WiFi networks and you really have a complete programmable security tool. I did have trouble with the WiFi on my prototype board, but again, it seemed to be a coding issue and I am sure it will be taken care of soon.
It has two built in Grove connectors so you can attach a wide variety of sensors to it, greatly increasing its capabilities. Or use a WIO Link card to greatly increase its sensor connectivity:
I am really looking forward to delving deeper into this tool in the next few months. I think it has the capabilities to be a great addition to a Pentester’s toolkit, with the right programming and connected sensors. The WIO Terminal from Seeedstudio, Check it out!
Stuck at home because of the quarantine, and looking for something to do? Look no further, how about creating a DIY project with Seeeduino XIAO! Seeedstudio sent me their newest Arduino board and several Grove sensors for testing and review. I honestly have to say, I haven’t had this much fun playing with hardware in a long time!
I will give a quick overview of the Seeeduino XIAO and show a few examples of it interfacing with sensors. My personal goal for using the XIAO is twofold, to make smarter “Magic Mirrors”, and Red Team Pentest drop boxes. In this article, I quickly show how I used a XIAO and an LED Ring in an Arduino Magic Mirror. In future articles, I will show how to make smarter drop boxes with Grove sensors (I talk about one way to do this in my previous Seeed article).
Basically, imagine a Magic Mirror that turns on when you enter the room. Or one that could display a changing color bar that syncs with music. For my pentester friends, imagine smart drop boxes, ones that only scan for WiFi devices when there is a human in the room, or one that sleeps when the lights are off and only activates when someone turns the room lights on. All of this and more is/ should be possible with Grove sensors and an Arduino or Raspberry Pi board.
Alright, enough intro, let’s look at the Seeeduino XIAO!
The Hardware
The Seeeduino XIAO is Seeedstudio’s smallest Arduino board. It is about the size of a US Penny, and only about $5 – but it is a fully functional Arduino board. The tiny board comes with breadboard leads that you can solder to the board, if you wish. I haven’t soldered in a long time, so soldering the leads to the board was a little challenging at first, but then I found that just laying the tip on the middle top edge of every pin worked great!
You probably want your pins so they are longer on the bottom, so they will connect into the breadboard. For my future projects, I wanted the pins coming out the top of the board, so I can install it flush to the bottom of a case, so mine are “upside down”.
The Software
The Seeedstudio XIAO Wiki covers downloading the necessary drivers and setting up the Arduino environment, so I am not going to cover it.
Start Arduino IDE, follow the instructions in the WIKI on installing the XIAO board and configuring the correct port for it (Getting Started section)
Load the “Blink” program in the examples, and compile and upload it, to make sure everything is setup properly
That’s it! Your XIAO is now ready for your projects!
Mini Seeeduino & Grove Weather Station
Using the XIAO and a Grove Sensor together is a snap, they interface very easily together. Though, you will need to either use jumper wires or modify a Grove connector to connect them to the XIAO. On some sensors, like the High Precision Barometric Pressure Sensor (DPS310), you can just use female to female jumper wires.
Using the Barometric Sensor, you can quickly and easily create a mini weather station! Just follow the instructions on the Seeedstudio GitHub Page, make the correct wire connections, compile and run the program, switch to the Arduino monitor, and you will see both pressure and temperature settings. This is shown in the picture above.
Login to a Raspberry Pi Through a XIAO
Another cool thing you can do with the XIAO is use it as a USB to serial interface. One use for this setup is to login to a Raspberry Pi through a Windows 10 USB connection!
Complete instructions for doing this can be found in the XIAO Wiki, just follow the steps to wire your Pi to your Arduino. Compile and load the program onto the XIAO. Run Putty on your Windows 10 system, configuring it to connect to the XIAO Com port. Then power on your Pi, configure it to allow the Serial Terminal in Raspi-Config, or set the Uart command in config.txt (instructions in the Wiki) and you are good to go.
Once everything is setup, hit, “enter” in the Putty terminal and you will see the Raspberry Pi login screen! As seen in the picture above – How cool is that?
Grove LED Ring
The Seeed Wiki doesn’t cover how to use the Grove LED ring with the XIAO, but it is very easy. Just follow the instructions given on the Grove Ring Wiki:
Connect the LED ground to XIAO ground, +V to 3.3 on the XIAO, and Signal to pin 6.
Install the Grove LED ring Library
Then run any of the bottom (not the first) programs listed in the Grove Wiki
And you should see something like the picture below:
That’s it, you can quickly and easily control the LED ring with the XIAO!
The nice thing is that you can use the XIAO as a very cost-effective LED controller in your projects. For example, I used mine in an Android Magic Mirror that I made a while back. Magic mirrors are very easy to make, I just used an old Android tablet, Magic Mirror software (there are several to choose from), a large picture frame and a piece of one-way glass that fit into the frame. The Android display shines through the 1-Way glass and seems to appear in the mirror.
I mounted the XIAO and the LED ring into my magic mirror and it worked fantastic!
The LED ring, powered by the XIAO showed extremely well through the Magic Mirror glass. Again, this is a “step one” proof of concept kind of thing. Additional work with straight LED’s and you could light the entire edges up, or possible, with something like a Raspberry Pi, you should be able to get the LED ring to sync to music as a song played.
Conclusion
I only briefly covered a handful of possibilities with using the XIAO. As I mentioned earlier, this board was a lot of fun to tinker with, it is a great project board for small and large projects alike. I really look forward to using this in future drop box and Magic Mirror projects. If you want something a little larger, with built in Wi-Fi and an LCD screen, I will be reviewing the WIO Terminal soon!