
This is a partial sample chapter from my latest “Security Testing with Raspberry Pi” book – The full chapter (chapter 4) is over 20 pages long and includes how to use several of the installed Kali Linux tools.

In this chapter we will cover installing Kali Linux on a Raspberry Pi 3b+. We will also see how to run several Kali tools on this platform. As I assume the reader has used Kali Linux before, the goal is to show how to get up and running quickly on a Raspberry Pi, not necessarily to show how to run each individual tool. Most of the tools work just like they would in a full PC install of Kali. Though some of the tools, like Hashcat, apparently don’t have ARM compatible binaries and are not included in the Kali Pi version.
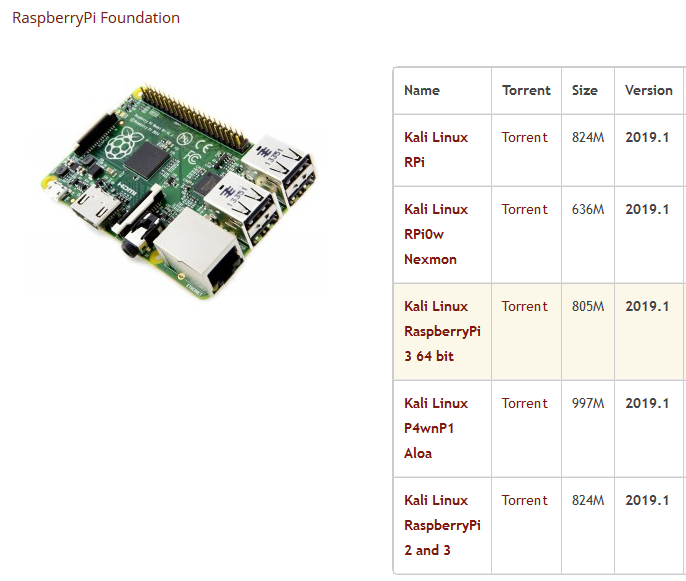
Surf to the Offensive Security Website:
https://www.offensive-security.com/kali-linux-arm-images/
Navigate to the Kali ARM images and then select the Raspberry Pi branch. Download the version of Raspberry Pi for the Pi that you have. I used a Pi3b+ for this chapter, so I downloaded the Kali Linux Raspberry Pi 3 64-bit image. If you have a Pi 4, you must download the Pi 4 version of Kali.
Once the image is downloaded, all you need to do is write it you your SD Ram card.
Etcher works great:

Insert your memory card into the Pi, attach keyboard, mouse, network line, and video cable. Lastly, plug in the power cord. The Pi will boot up and give you a graphical login screen.
- Login with User: root, Password: toor
At the “Welcome to the first start of the panel” message, click on “Use default config”. You will then be presented with the Kali Desktop. Take a second and familiarize yourself with it. You will notice it is slightly different looking than the regular Kali Desktop, as it is using a different desktop environment. Xfce is used as the default Pi interface as it is a lightweight and fast desktop. But it is the same Kali underneath that you know and love.

Click the “Applications” button to see the tools menu. They are pretty sparse at the moment; we will fix that soon. There are a couple house keeping things we need to do first.
The first thing we will want to do is regenerate the SSH security keys.
- Open a Terminal
- cd /etc/ssh/
- mkdir default_keys
- mv ssh_host_* default_keys/
- dpkg-reconfigure openssh-server
In a couple seconds we should have new SSH security keys.
In the current version of Kali for the Pi, root login is permitted by default. This is fine for our lab, but this is something you would want to change in “/etc/ssh/sshd_config” if you were going to use this for regular purposes. You will also want to change the root password using the “passwd” command.
The SSH server is already started by default in the Kali Pi install, so all we need is the IP address of Kali. If you are an old time Linux user like me you will probably still use Ifconfig, the old “deprecated” commands are easier to use and look nicer in my opinion, (have to love change, lol) though you are supposed to use the “ip” command now.
- Enter, “ip a” to see all the network addresses or “ip -4 a” to only see the ip 4 address.

Now you can just SSH or use Putty like we did in the previous chapter to connect remotely to the Kali system.

The Kali-Pi image comes pre-installed with some tools already installed. They were called the “top 10” in an earlier release of Kali and include Metasploit, nmap, Recon-NG, etc. The rest of the Kali tools can be downloaded via Kali “Metapackages”. Metapackages are security tool packages grouped by function. If you have a 16 GB or greater SDRam card, and a lot of patience, you can install the full Kali Linux install. If you didn’t need all of these tools, you could install just the Wireless tools (kali-linux-wireless) or the Web Application Assessment tools (kali-linux-web), depending on your needs.
All the available Metapackages are listed on the Kali Metapackages website:
Installation is simple, in a terminal just enter, “apt install” along with the metapackage that you want. You basically have 2 options; you can install the full package or individual tool packages. The only drawback to option 2 is that some of the necessary “helper” tools may not be installed and you may need to install them manually.
Option 1
If you want the full Kali install:
- apt install kali-linux-full
This includes all the tools from a normal Kali Linux install. This will take a very long time to install, so be patient.
Option 2
If you want to install a specific category of tools:
Depending on what you want to do with your Kali install, a good choice is the Wireless tools. The wireless package includes numerous tools including ones for Wi-Fi, Bluetooth & SDR. You can see what packages are included by using the following command:
- apt-cache show kali-linux-wireless |grep Depends

If these are the tools that you want, then proceed with the install:
- apt install kali-linux-wireless
Whichever option you pick, the new tools will show up in the Kali menu after the install:

Either install option seems to take hours, be patient, and reboot when it is finished.
The downloaded tools are the SAME tools that you would receive on the regular Kali install. These aren’t watered down versions or anything like that. I have run into a couple tools that didn’t work, or seemed to be missing, but it is a rare occurrence. If it works in the regular Kali install, chances are you can do the same thing, the same way, in the Raspberry Pi version. So, after that long install, let’s play!
If you liked this sample and want to learn a lot more about using the Raspberry Pi for Ethical Hacking, check out my new book, “Security Testing with Raspberry Pi“!
