The LaZagne Project dumps 22 Different Program Passwords

LaZagne Passwords

The LaZagne Project by Alessandro ZANNI is a nifty little utility that displays passwords for 22 Windows and 12 Linux programs. This is a nice tool for penetration testers when you want to quickly dump passwords after you gain access to a system.

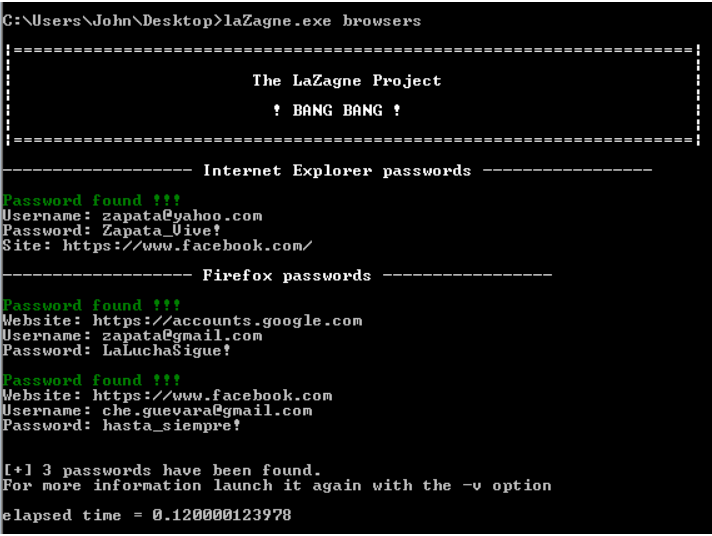
For Windows, simply download the standalone version and run it. Running “laZagne.exe all” will dump all the passwords that it can find:

LaZagne 2

You need to have administrator access to pull user login passwords. For “verbose” mode, which adds additional information when it runs, simply add a “-v” switch. If you just want to pull individual passwords, simply run the program using one of the modules below:

LaZagne Password modules

According to the The LaZagne Project webpage it can display the following passwords:

LaZagne Password modules 2

LaZagne works fast and easy!


Mass Scanning a Website for File Inclusion Vulnerabilities using Fimap and Metasploitable

Fimap by Iman Karim (https://tha-imax.de/git/root/fimap) is a great tool to scan a website for File Inclusion vulnerabilities. In this short tutorial I show how to scan the entire Metasploitable2 Purposefully Vulnerable VM with Fimap and spawn a remote shell!

Mass Scanning

Fimap can scan a target website and harvest links from it and store them so they can be used as input to its mass scan feature. Simply run fimap and use the “-H” switch to tell it to harvest links, “-u” to tell it the target website IP, “-d [x]” to tell it how deep to look for links and finally “-w [outputdirectory]” to tell it where to store the links, like so:

fimap scan one

Now that we have a list of target links stored in the “/tmp/urllist” file, we simply feed this back into Fimap to look for vulnerabilities:

fimap -m -l ‘/tmp/urllist’

This will take forever to run as I told it to pretty much harvest the links from the entire Metasploitable VM in the previous command, but check out the results:

fimap scan metasploitable

Holy cats, 688 possible File Inclusion vulnerabilities!

Exploiting via Remote Shell

One of the great things about Fimap is its ability to create a remote shell with the vulnerable page. So let’s try it with one of the 688 vulnerable pages. To do so, we simply run “fimap” with the “-x” switch:

  1. Type “fimap -x”
  2. A list of scanned domains will appear, select the the one (“1”) we just scanned.
  3. A huge list of vulnerable pages will appear, so let’s select say, “100”.
  4. Now at the Available Attacks screen, select “#2 – Spawn Pentestmonkey’s reverse shell”

RFI LFI Fimap

It will then tell you to open another terminal and run Netcat (netcat -v -l -p 4444). Then just hit enter in fimap and you have a remote Netcat shell!

fimap reverse shell

As you can see we have opened a remote shell through on of the vulnerable pages, nice! Now let’s try the other 588 possibilities. Well, maybe not, lol!

Conclusion

File Inclusion vulnerabilities are becoming more and more rare with current coding practices, but hopefully this shows that File Inclusion coding errors can be exploited for detrimental results. Companies need to be sure to use secure coding practices and test their websites for common vulnerabilities.

If you liked the tutorial, and want to learn more about ethical hacking, check out my book, “Basic Security Testing with Kali Linux“.

Automatic Web App Security Testing with OWASP ZAP

OWASP Zed Attack Proxy (ZAP) or ZaProxy, as it is also called, is an exceptional tool for both security testers and developers to test web application security. In this tutorial we will take a quick look at how to use a couple common features in the latest version of ZAP, including the quick attack and the Man-in-the-Middle Proxy scan and fuzzing features.

For this article, I used Mutillidae as a test target and ran ZAP from a Kali Linux system. As always, never use tools like this against systems that you do not have permission to do so.

Quick Scan & Attack

To start the quick scan, simply enter the address of your target (a Mutillidae system here) in the “URL to attack” input box and click the “Attack” button.

ZaProxy Quick Scan

This will spider the entire target website and then active scan it for vulnerabilities. The scan progress and pages found will be displayed in the bottom window. When it is finished press “Alerts” to see any security issues with the website:

ZaProxy Quick Scan 1

And as you can see, ZAP found multiple issues with the website! Each folder contains different types of security issues, color coded for severity. Clicking on the folder will reveal individual issues that you can select for additional information. ZAP is wonderful because it not only lists an in-depth explanation of the problem, but it also gives you recommendations on resolving the issue.

This is nice, but we can do a much more in-depth scan and even perform fuzzing attacks using ZAP’s proxy function.

Proxy Scan and Fuzzing

Start ZAP and then set your browser internet proxy settings to Localhost:8080. Then surf to the target webpage and login. Surf to a few other pages if you like, entering data as you go, the more site interaction the better. When done, return to ZAP, highlight the website in the “Sites” window, right click on it and select “Attack”, and then “Active Scan”:

ZaProxy Active Scan

ZAP will perform an in-depth scan of the page, including the new information obtained with the ZAP proxy. When the scan is done, click on the Alerts folder:

ZaProxy Active Scan 1

Notice we now have more alerts including SQL Injection issues. Let’s see what SQL attacks would work against the target.

In the sites Window, select the login webpage, right click on it and select, “Attack” and then “Fuzz…” This will open the fuzzer screen. It lists the header text in the top left box, the target query with selectable text in the bottom left box and the fuzz location/tool window on the right.

  • In the bottom left window, highlight the name you used to login as a keyword. I used the username, “test”.
  • Now click “Add” in the right Window:

OWASP Fuzzing

  • A Payloads box pops up showing the value of “test”. Click “Add” again to select our attack payloads.
  • In the drop down box that says ‘Type:’ select, “File Fuzzers”:

OWASP Fuzzing 1

  • Now click the triangle next to “jbrofuzz” to expand the options:

OWASP Fuzzing 2

  • Notice the large amount of different attack types you can use! We just want to try SQL Injection for now, so check the “SQL Injection Box”, and click “Add”.

You will now be back at the payload screen. Notice that at this point you could add multiple keywords and numerous payloads if you wanted to create a very complex attack. But for now we just want to attack the keyword ‘test’ with SQL Injections.

  • Click “OK” to continue.
  • Now just click, “Start Fuzzer” to begin.

This can take a short while to run, but within a few seconds you should already see multiple SQL injection attacks and their statuses shown in the status window:

OWASP Fuzzing 3

So fairly quickly we were able to scan a site for a host of SQL injections issues. Add to that the ability to select multiple keywords and payloads and you have a very powerful web application testing tool!

Mutillidae Database Errors in Metasploitable 2

I really enjoy using Mutillidae, it is one of my favorite teaching tools. I usually run it on a Windows box, but when I went to use it in the Metasploitable 2 VM I was getting a lot of database errors. Scanning through the support sites and comments I finally found that their is a configuration file issue and wanted to re-post the fix here.

You need to change the database name from “metasploit” to “owasp10” in the “config.inc” file.

In Metasploitable VM navigate to /var/www/Mutillidae

  • Type, “sudo nano config.inc”

Change the database name from ‘metasploit’ to ‘owasp10’ :

metasploitable database error

metasploitable mutillidae error

  • Restart Apache by typing, “sudo /etc/init.d/apache2 reload”
  • Lastly open Mutillidae in a browser
  • Click, “Reset DB”

You should now be all set to use Mutillidae!