LPS Linux – The Publicly Available Air Force Secure Linux Distro

LPS Desktop

Looking for a Secure Linux Distribution and not sure what to use? Why not try the publicly available Linux Distro created by the US Air Force?

Several nations are moving to or modifying their own Linux distributions for military use. And honestly, it just makes sense. But did you know that the SPI working with the US Air Force created the “Lightweight Portable Security” Linux (or LPS for short) and have released it for public use?

LPS is a publicly available, secure Live CD that offers security, sandboxing and encryption.

The ATSPI Technology Office produces nation-state class protection products, and according to the LPS website, “LPS-Remote Access was certified by AFNIC to connect to the GIG for general telecommuting use“. A whole lot of acronyms there, but basically what it means is that LPS is secure – secure enough to be certified by the Air Force to connect to the DoD Global Information Grid – the military’s information super highway.

And if it is good enough for military certification, you can believe that it is capable and safe for secure civilian use.

So what does it look like?

Well, a full blown Ubuntu operating system it is not. It comes with very few bells and whistles. But that is the point. The fewer the frills, the easier it is to secure it.

LPS Menu

As you can see from the user menu above, there are not a lot of pre-installed apps. Though LPS does come in a “Deluxe” version that includes OpenOffice and Adobe Reader.

LPS is meant to be used as a live CD. Simply download LPS, burn it to a CD and then boot from it when you need to use a secure OS – Like when you are traveling abroad or using public internet.

It does not write to the hard drive and does not leave anything in memory when shut down. Because it does not write anything to the hard drive, if by odd chance that LPS does get infected, there is no persistence. Just reboot and the malware will be gone.

LPS seems to be mainly be oriented to surfing, e-mail and data transfer. According to Lt. Col. Ken Edge, Air Force Research Laboratory’s Software Protection Initiative (SPI) program manager, “Imagine a pilot overseas who has to get orders but only has a very questionable Internet café computer, with LPS-Public and a smartcard reader, he can safely enter the CAC-authenticated Air Force Portal and his webmail. Likewise, sailors can securely bank online overseas, and soldiers can safely use social networking sites.”

It even comes with an easy to use Encryption Wizard that allows you to encrypt your data before transmitting it over the wire:

Encryption Wizard

Simply run the wizard, and drag the file you want to encrypt into the program box, then select how you want to encrypt it:

Encrypting File Passphrase

The wizard also decrypts files in the same easy to use manner.

There are other secure Linux distros out there with more capabilities, Tails Linux comes to mind. But if all you need is a simple, easy to use secure Live CD solution, then look no further than LPS Linux.

Raspberry Pi: Installing PwnPi & using SSH from a Windows System

RaspiModelB

In my previous post I briefly discussed what PwnPi is, and what the requirements are to run it. In this article we will actually learn how to install PwnPi on a Raspberry Pi board, creating a $35 pentesting platform!

Most posts I have seen cover installing Raspberry Pi disk images from a Linux view point. In this post we will cover installing PwnPi from a Windows perspective.

For this install we will need a Raspberry Pi (I used the 512MB model B), a power source for the Pi, an SD card 8GB or Larger (I used a 16GB) and a Windows System to install the PwnPi disk image onto the SD card. You will also need an Ethernet connection and optionally a keyboard and mouse.

(Check out the notes on these items in the intro article.)

Once we have everything together, it is time to install PwnPi.

1. Download the PwnPi image.

2. Install the image to your SD card – Disk Imager works great.

Just plug your SD card into your Windows Laptop, and run Disk Imager. Point the image file to your PwnPi image that you downloaded and point the device to the drive letter of your SD card:

Disk Imager 2

Then just hit “Write”.

Disk Imager will write the PwnPi image to your SD card:

Disk Imager 3

3. Now eject the SD card from your windows laptop and insert it into the SD card slot on your Raspberry Pi. Connect your video, Ethernet cable, and keyboard and mouse. (See connection chart at the top of the post)

4. Connect power to the Raspberry Pi and in a few seconds it will boot up into PwnPi.

That is it! You know have a Raspberry Pi Pentesting platform!

Connecting to the Raspberry Pi remotely from a Windows system using SSH

Now you can run commands from the command prompt, or if you want to run the Raspberry Pi headless (without monitor or keyboard). You can connect to the Pi from a Windows system remotely using SSH!

To Do so:

1. Download Putty for Windows

2. Run Putty and put in the IP address for your PwnPi. You can get this by typing “ifconfig” if you have a keyboard attached or by checking the address given to it by your router if you are running PwnPi headless.

My IP address was 192.168.1.101 in this case. Also, make sure port 22 is entered and select SSH as shown below:

Putty

Then just hit “Open”.

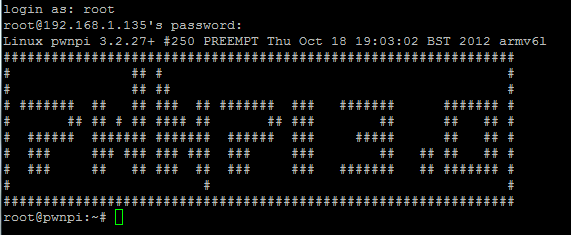
You will be asked asked to log into the Raspberry Pi. If this is the first time, just use the PwnPi default credentials:

Username: root
Password: toor

SSH Interface

That’s it!

Now you can run any of the commands you want on your Raspberry Pi remotely from your Windows System.

Here is a sample nmap command:

NMap

We now have a $35 pentesting platform!

We will take a closer look at other things we can do with PwnPi in future articles.

Enjoy!

Raspberry Pi: Creating a Pentesting Platform with PwnPi – Intro & Requirements

SSH Interface

Finally got my hands on a Raspberry Pi – the $35 computer. My first project that I wanted to do with this little wonder was create a security testing platform with it. How hard would it be to make this little wonder into a pentesting platform?

Not hard at all – With the help of PwnPi!

PwnPi brings the power of over 200 security tools to the Raspberry Pi platform. In this article I will cover getting PwnPi installed on the Raspberry Pi using a Windows based system.

First you need to get a Raspberry Pi. There are several places to get them, Google it. I purchased mine from the RIT Linux club. I know the professor that runs it and it was for a good cause.

Next you need a SD Card, power and peripheral devices. The Pi does not come with any of these. I will leave this step up to you also. But note, the video you use must either have an HDMI or RCA jack. Also the power plug type and amperage is a bit picky. From what I read you need one that puts out 1-2 amps of current. If it puts out 1 or less amps the PI may become unstable if your peripherals are not low power.

The power adapter that I had that fit it was only 700ma. Using this I could only have the keyboard, mouse or network line connected, but not more than one. This wasn’t a problem, as you can use SSH to connect to it from a Windows machine. I will discuss this later.

Also, are saying that class 4 SD Cards are very slow, and recommend higher ones. I found a Sony 16GB card with a  speed of 15MB/S which works great! (You could probably get a way with an 8GB one for PwnPi).

Okay, let’s get this going! In my next post I will cover installing PwnPi.